• Earn real money by being active: Hello Guest, earn real money by simply being active on the forum — post quality content, get reactions, and help the community. Once you reach the minimum credit amount, you’ll be able to withdraw your balance directly. Learn how it works.

I need help/advice; I don't have enough free space to update/upgrade Kali Linux

Status
Not open for further replies.

usernamerequired

PRIV8
PRIV8
Shadow
Joined
Jan 3, 2025
Messages
50
Reputation
0
Reaction score
3
Points
8
Credits
230
‎7 Months of Service‎
100%
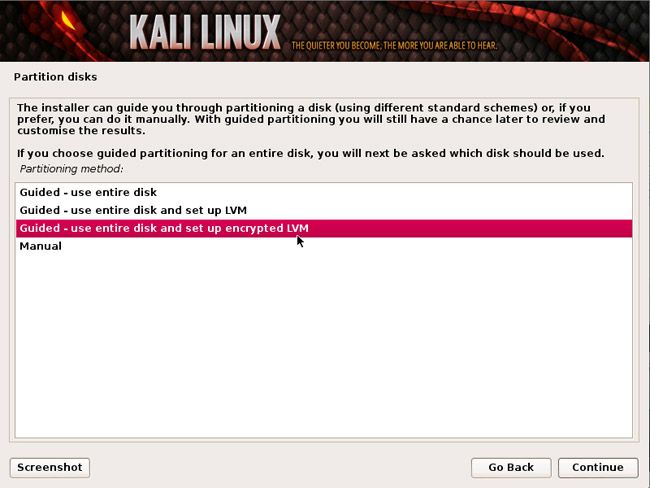
I am still very much finding my feet when it comes to using this OS but i've stumbled upon an error that i don't even want to attempt to rectify myself as i know that i have NO idea what i'm doing when it comes to partitioning and adding/allocating storage space etc.

I am running Kali Linux through VMware Fusion 13 on a macbook Pro if that makes any difference rectifying the following:


Summary:
Upgrading: 1091, Installing: 47, Removing: 0, Not Upgrading: 36
Download size: 2242 MB
Space needed: 1036 MB / 2159 kB available
└─ in /boot: 296 MB / 292 MB available

Warning: More space needed than available: 1036 MB > 2159 kB, installation may fail
Warning: More space needed in /boot than available: 296 MB > 292 MB, installation may fail

Error: You don't have enough free space in /var/cache/apt/archives/.


Thank you immensely in advance 🙏
 
Solution
‎7 Years of Service‎
That's the trouble, The preferences are what i need help with. I winged it last time so I'm not actually sure how much of what to give each is an appropriate amount + encryption to ensure smoothest operation for as long as possible
usernamerequiredThis may vary depending on the programs and uses you expect to give Kali Linux, but I generally recommend this configuration.


Recommended Kali Linux VM Preferences (Ideal Setup):


1. Virtual Disk Size:


Recommended: At least 50–60 GB (or more).
(50 GB is comfortable for most users. If you're planning heavy usage, consider 60–80 GB.)


2. RAM (Memory):​


Recommended: At least 4 GB RAM.
(You can increase this to 6–8 GB if your Mac has sufficient memory...
Hi there! It looks like you’re facing the same storage issue you mentioned before. To resolve this problem, we really need a bit more information from you. Specifically, please provide:

1. Screenshots showing your VMware Fusion disk settings, so we can verify whether you actually increased the virtual disk capacity.


2. The output of the following commands inside Kali (copy and paste them here):

Bash:
df -h
sudo fdisk -l
lsblk

These will tell us how your current disk is partitioned and whether you have any unallocated space.


Once we see those details, we can guide you on how to safely resize your partitions. The usual steps (summarized again) are:

1. Increase the virtual disk size in VMware Fusion:

Shut down your Kali VM.

In VMware Fusion, go to Settings → Hard Disk and resize it to a larger capacity.


2. Boot Kali and resize the partition:

If you’re unfamiliar with command-line tools like fdisk or parted, it’s often safer to use a tool like GParted from a live USB.

Extend your main (root) partition to take advantage of the new disk space you allocated in step 1.


3. Check free space with df -h again to confirm the changes.


4. Clean up old kernels and caches if needed:

Bash:
sudo apt clean
sudo apt autoremove --purge

But this only helps if your partition has enough total space. Without resizing the partition, you’ll likely run into the same issue again.


Without screenshots and the partition information, it’s hard to pinpoint exactly what went wrong or what hasn’t been done yet. Please share those details, and we’ll do our best to walk you through the next steps safely!


---

TL;DR: We suspect your virtual machine disk isn’t actually enlarged or that your root partition hasn’t been extended to use any extra space. Post those screenshots and command outputs, and we’ll help you get everything resized properly.
 
Hi there! From the screenshot you shared, it looks like your virtual disk is at 30GB total, but your main Kali partition is only around 20GB. That indicates your VMware disk capacity is larger than your Linux partition (especially if it’s encrypted with LUKS and running LVM). Technically, you can extend your existing partition and file system to make use of all 30GB (or even resize the disk further). However, if you are still relatively new to partitioning and encryption setups, it might be much simpler to:


  1. Create a fresh VM with a bigger disk size (e.g. 80GB or more).
  2. Install Kali Linux on that new VM.
  3. If you have any important files on your old VM, just copy them over to the new one (e.g. via file transfer, shared folders, or a USB passthrough).

This approach saves you from having to manually:


  • Boot a live ISO,
  • Resize the encrypted partition with parted or GParted,
  • Extend LUKS,
  • Resize your LVM volumes, etc.

By making a new VM from scratch, you get a clean start with enough space, and you can easily back up or migrate only the files and tools you actually need from the old VM. Unless you have very specific reasons to keep the existing Kali setup as is (e.g., special configurations or installed software), building a fresh, larger VM is often faster and safer for beginners.


If you do want to resize the existing setup:


  • Make sure you increase the VMware disk to a larger size (like 80GB).
  • Boot from a live ISO in VMware Fusion (GParted or Kali’s live mode).
  • Resize /dev/nvme0n1p3 (or whichever partition is used by Kali).
  • Unlock and resize the LUKS container, then pvresize and lvextend to grow the LVM.

But again, creating a new VM is usually simpler if you’re not fully comfortable with partitioning and encryption tools yet.
dEEpEstOh. My. Gosh 🤕

I deffinitely don't want to start again, I've got a few little projects on the go that i don't want to loose.. But that being said, I am absolutely not confident doing any of what you said without clear and consice step by step instructions 😅😅😅
 
Oh. My. Gosh 🤕

I deffinitely don't want to start again, I've got a few little projects on the go that i don't want to loose.. But that being said, I am absolutely not confident doing any of what you said without clear and consice step by step instructions 😅😅😅
usernamerequired
Here's a step-by-step set of instructions to expand your existing Kali installation without starting over. Before you begin, please back up your important projects or take a snapshot of your VM so you can recover in case anything goes wrong.


1. Increase the Virtual Disk Size in VMware Fusion​


  1. Shut Down Your VM:
    Make sure your Kali VM is powered off.
  2. Open VMware Fusion Settings:
    • In VMware Fusion, select your Kali VM.
    • Click on Settings (or Virtual Machine > Settings).
  3. Expand the Hard Disk:
    • Go to the Hard Disk or Disk section.
    • Look for an option like “Expand Disk” or “Resize”.
    • Increase the disk size to a value you’re comfortable with (for example, 80GB instead of 30GB).
  4. Save and Restart:
    Save the changes and power on your VM.


2. Boot from a Live ISO (Using GParted or Kali Live)​


Since you cannot modify the root partition while it’s in use, you’ll need to boot from a live environment.


  1. Download a Live ISO:
    Get a live ISO image such as
    This link is hidden for visitors. Please Log in or register now.
    or use the
    This link is hidden for visitors. Please Log in or register now.
    .
  2. Attach the ISO to Your VM:
    • In VMware Fusion, go to SettingsCD/DVD.
    • Select “Use ISO image file” and browse for the ISO you downloaded.
    • Set the boot order to boot from the CD/DVD drive if necessary.
  3. Boot Into the Live Environment:
    Start your VM and choose to boot from the ISO.


3. Resize the Partition Using GParted​


  1. Launch GParted:
    Once booted into the live environment, open GParted (it should be available if you’re using the GParted Live ISO; otherwise, you may need to open the GParted utility from the live system’s menu).
  2. Identify Your Main Partition:
    Look for your primary partition (it might be something like /dev/nvme0n1p3).
  3. Resize the Partition:
    • Right-click the partition and select “Resize/Move.”
    • Drag the slider or type in the new size to expand the partition to use the additional space (e.g., extend it from 20GB up to nearly 80GB).
    • Click the “Apply” button to commit the changes.
  4. Wait for the Operation to Complete:
    Once finished, close GParted.


4. Resize LUKS, LVM, and the Filesystem​


If your Kali installation uses encryption (LUKS) and LVM, follow these steps. If not, you can skip to Step 6.


  1. Boot Back Into the Live Environment (if not already in it).
  2. Open a Terminal.
  3. Unlock the LUKS Container:
    Replace /dev/nvme0n1p3 with your partition if different.

    Bash:
    sudo cryptsetup luksOpen /dev/nvme0n1p3 mycrypt
  4. Resize the LUKS Container:
    This ensures the encryption container recognizes the new partition size.

    Bash:
    sudo cryptsetup resize mycrypt
  5. Resize the Physical Volume (PV) in LVM:

    Code:
    sudo pvresize /dev/mapper/mycrypt
  6. Extend the Logical Volume (LV):
    Replace /dev/kali-vg/root with the actual path for your root LV if it differs.

    Bash:
    sudo lvextend -r -l +100%FREE /dev/kali-vg/root
    The -r flag automatically resizes the filesystem as well.
  7. Verify the Changes:
    Check that your root filesystem now shows the increased size:

    Bash:
    df -h


5. Reboot Into Your Normal Kali Installation​


  1. Remove the Live ISO:
    Go back into your VMware Fusion settings and remove the live ISO from the CD/DVD drive.
  2. Restart the VM:
    Boot normally into your Kali installation.
  3. Verify Available Space:
    Open a terminal and run:

    Bash:
    df -h
    Confirm that your root partition now reflects the increased space.


Additional Notes​


  • Take Your Time:
    These steps involve modifying partitions and encrypted volumes, so double-check each command and change before applying.
  • Backup Is Key:
    Ensure you have a backup or snapshot before starting in case you need to revert any changes.
  • Ask for Help:
    If you run into any specific issues or error messages during any of these steps, feel free to post the details here, and we can help troubleshoot further.

By following these instructions, you should be able to expand your existing Kali installation without losing your current projects. Let me know if you have any questions or need further clarification on any step!
 
Okay so after an extensive amount of reflection, I figured it wouldn't hurt to let go of these little projects I've got going on and start fresh and this time properly - as my current Kali was installed and partitioned with no experience, knowledge or guidance and was used for the first couple of months, again with no experience, knowledge or guidance and I've come to the realisation that there is indefinitely some integral steps or set-up mishaps or missing parts/information I lacked during the installation and set-up process that causes evident system errors and glitches and overall problems with my machine now and with the progress I've made and the passion I have to keep moving forward with it, It's better to just rip the bandaid off now and actually ask for advice on the proper process and steps of installation from experienced experts and avid users.

So that being said, if anyone has any time on their hands and cares to "show me the way" 🙏🥹🥹🥹🥹
usernamerequiredSimply download the Kali Linux virtual machine and open it in your VMware, Specify your preferences such as storage size, RAM, etc... and run machine.

Download For VMware
This link is hidden for visitors. Please Log in or register now.
Manual Install Kali Linux in VMware
This link is hidden for visitors. Please Log in or register now.
 
Simply download the Kali Linux virtual machine and open it in your VMware, Specify your preferences such as storage size, RAM, etc... and run machine.

Download For VMware
This link is hidden for visitors. Please Log in or register now.
Manual Install Kali Linux in VMware
This link is hidden for visitors. Please Log in or register now.
dEEpEstThat's the trouble, The preferences are what i need help with. I winged it last time so I'm not actually sure how much of what to give each is an appropriate amount + encryption to ensure smoothest operation for as long as possible
 
That's the trouble, The preferences are what i need help with. I winged it last time so I'm not actually sure how much of what to give each is an appropriate amount + encryption to ensure smoothest operation for as long as possible
This may vary depending on the programs and uses you expect to give Kali Linux, but I generally recommend this configuration.


Recommended Kali Linux VM Preferences (Ideal Setup):


1. Virtual Disk Size:


Recommended: At least 50–60 GB (or more).
(50 GB is comfortable for most users. If you're planning heavy usage, consider 60–80 GB.)


2. RAM (Memory):​


Recommended: At least 4 GB RAM.
(You can increase this to 6–8 GB if your Mac has sufficient memory, especially if using resource-intensive tasks.)


3. CPU Cores:​


Recommended: Allocate 2 processor cores.
(2 cores is sufficient for smooth performance. You can allocate more if your MacBook Pro allows it, but typically 2–4 cores is best.)


4. Encryption (Full Disk Encryption with LUKS): (Recommended for security and privacy.)​


When installing Kali, choose:
Guided – use entire disk and set up encrypted LVM”.
image.jpg


You'll be prompted for an encryption passphrase.
Make sure to choose a strong passphrase that you won't forget.


Encryption Note:​


Full disk encryption slightly reduces performance (minimal for most daily tasks), but significantly improves security and confidentiality.

The trade-off is usually worth it unless you have extreme performance needs.


5. Network Settings (in VMware Fusion):​


Recommended: NAT (Network Address Translation)
(This allows internet access via your host machine without direct network exposure.)


6. Graphics/Display Settings:​


Use VMware's default graphics settings. Usually, VMware's automatic settings are optimal for Kali Linux.


Step-by-step Quick Summary of Ideal Settings:​


Disk: 80 GB

RAM: 4–8 GB

CPU: 2-4 cores

Partitioning: Guided partitioning with encrypted LVM

Encryption: LUKS full-disk encryption enabled

Networking: NAT


After Installation (Immediate post-installation tasks):​


Run these commands after first boot to fully update your system (important):

Bash:
sudo apt update && sudo apt upgrade -y
sudo apt dist-upgrade -y
sudo reboot

Then, install VMware Tools (for better performance and integration):

Bash:
sudo apt install open-vm-tools-desktop -y
sudo reboot

Finally, take a snapshot in VMware Fusion right after completing this setup. It will provide you with an easy fallback in case you make mistakes or encounter issues down the road.


Why This Setup?​


This configuration is carefully balanced:

Enough disk space and resources to handle updates and projects for a long time without storage issues.

Encryption provides solid security without excessively impacting performance.

The provided resources (RAM/CPU) are sufficient for the vast majority of Kali Linux use cases without overwhelming your host system.


This approach ensures your Kali installation stays stable, performant, and secure over the long term.


:cool: Bonus

You can also set up some useful things like emergency self-destruction of decryption keys to leave the share inaccessible.
This link is hidden for visitors. Please Log in or register now.


-- Hack Tools Dark Community --
 
Solution
This may vary depending on the programs and uses you expect to give Kali Linux, but I generally recommend this configuration.


Recommended Kali Linux VM Preferences (Ideal Setup):


1. Virtual Disk Size:


Recommended: At least 50–60 GB (or more).
(50 GB is comfortable for most users. If you're planning heavy usage, consider 60–80 GB.)


2. RAM (Memory):​


Recommended: At least 4 GB RAM.
(You can increase this to 6–8 GB if your Mac has sufficient memory, especially if using resource-intensive tasks.)


3. CPU Cores:​


Recommended: Allocate 2 processor cores.
(2 cores is sufficient for smooth performance. You can allocate more if your MacBook Pro allows it, but typically 2–4 cores is best.)


4. Encryption (Full Disk Encryption with LUKS): (Recommended for security and privacy.)​


When installing Kali, choose:
Guided – use entire disk and set up encrypted LVM”.
image.jpg


You'll be prompted for an encryption passphrase.
Make sure to choose a strong passphrase that you won't forget.


Encryption Note:​


Full disk encryption slightly reduces performance (minimal for most daily tasks), but significantly improves security and confidentiality.

The trade-off is usually worth it unless you have extreme performance needs.


5. Network Settings (in VMware Fusion):​


Recommended: NAT (Network Address Translation)
(This allows internet access via your host machine without direct network exposure.)


6. Graphics/Display Settings:​


Use VMware's default graphics settings. Usually, VMware's automatic settings are optimal for Kali Linux.


Step-by-step Quick Summary of Ideal Settings:​


Disk: 80 GB

RAM: 4–8 GB

CPU: 2-4 cores

Partitioning: Guided partitioning with encrypted LVM

Encryption: LUKS full-disk encryption enabled

Networking: NAT


After Installation (Immediate post-installation tasks):​


Run these commands after first boot to fully update your system (important):

Bash:
sudo apt update && sudo apt upgrade -y
sudo apt dist-upgrade -y
sudo reboot

Then, install VMware Tools (for better performance and integration):

Bash:
sudo apt install open-vm-tools-desktop -y
sudo reboot

Finally, take a snapshot in VMware Fusion right after completing this setup. It will provide you with an easy fallback in case you make mistakes or encounter issues down the road.


Why This Setup?​


This configuration is carefully balanced:

Enough disk space and resources to handle updates and projects for a long time without storage issues.

Encryption provides solid security without excessively impacting performance.

The provided resources (RAM/CPU) are sufficient for the vast majority of Kali Linux use cases without overwhelming your host system.


This approach ensures your Kali installation stays stable, performant, and secure over the long term.


:cool: Bonus

You can also set up some useful things like emergency self-destruction of decryption keys to leave the share inaccessible.
This link is hidden for visitors. Please Log in or register now.


-- Hack Tools Dark Community --
dEEpEstThank you so much for all your help and advice! I'm currently re-installing as we speak following all your instructions of course - I'm at the "Partition Disks" section after I selected “Guided – use entire disk and set up encrypted LVM” and it's asking me which partitioning scheme I want to use out of
All files in one partition
Seperate /home partition
Seperate /home, /var, and /tmp partitions
Seperate /var and /srv, swap < 1GB (for servers)


Which one should I choose?
 
"All files in one partition" This is more appropriate for your experience
 
73.1 It's 100%, press continue.
 
Status
Not open for further replies.
Back
Top